Essentials for a Homeschooler’s Day Outside

Essentials for a Homeschooler’s Day Outside

Although homeschooling enables personalized learning wherein parents adapt to their children’s abilities, it does leave much to be desired in terms of outdoor experiences. Homeschool children need to spend time outside. Outdoor environments promote healthy emotional, physical, and social development. In a study on the importance of outdoor activities, Janet Loebach suggests that being outdoors creates diverse opportunities for unstructured play as well, which stimulates a kid’s creativity and problem-solving skills.

Outdoor environments encourage exploration and independence in children. From equipment for park strolls to museum dates, here are essentials you should pack for your homeschooler’s day outside:

1. Spare clothes

Indoors, you don’t have to worry as much about soiled clothes, especially not when your child’s closet is only a few steps away. However, unforeseen weather conditions or accidents can result in messy clothing when you’re taking your homeschooler outside. Before heading out, pack a change of clothes with you. We also recommend checking the weather forecast for rain later in the day. This way, you can come prepared and bring a raincoat or a warmer jacket to prevent your kid from getting sick. After all, catching a cold can put a damper on your fun learning trip outside.

2. Stroller

With young homeschoolers, carrying a stroller is best if you plan on taking them to sprawling places such as parks or planetariums. As the iCandy strollers prove, they allow you to stay mobile for a day of play and learning. If you’re worried about transporting the stroller, don’t be. Today, strollers come with car seat adaptors and seamlessly convert to a complete travel system, allowing you to use them with your car seat rig. If you have a packed itinerary that entails flitting from one museum to another, rest assured a stroller’s your best bet in ensuring a smooth trip.

3. Picnic Necessities

Taking your kids out for a picnic is a novel experience, especially when their lunch breaks are regularly taken inside the house. Eating outdoors can provide a much-needed break and change of scenery to your homeschool day. We recommend making an event out of the picnic, even if you only head out to your backyard or nearby park. Pack paper plates and plastic utensils, paper towels, and a picnic blanket alongside an insulated picnic bag and your kid’s favorite snacks. You can get all these from REI, a brand that offers an assortment of picnic tools, such as lightweight blankets that are resistant to the elements. All that’s left is to relax with your curious student as you help them identify different cloud formations in the sky.

4. Art Supplies

In our previous post ‘Summer Activities Your Kids Will Love’, we shared how kids enjoy using paint brushes to create different shapes on the sidewalk (yes, even with just water). Although art activities are easy to implement into your homeschool day, being outdoors exposes your children to new sights. To nurture their creativity, equip them with a small sketchbook and a set of colored pencils the next time you visit a park. It’ll be interesting to see them sketch several bird species or various colored flowers on paper. While these are objects you can show through books or on a screen, nothing beats seeing and capturing them in the flesh.

5. Game Equipment

A day out can be an opportunity for active play. When you take your kids outside, bring game equipment, such as jump ropes, hula hoops, or balls, with you. Ball play, for example, would entail bouncing, catching, dribbling, and throwing items. In an article on motor performance, Bouwien Smits-Engelsman explains how ball skills help build balance, problem-solving skills, and spatial awareness skills in children. To maximize your homeschooler’s day out, have exciting and educational game equipment on hand. This way, they can stretch their limbs as they learn a thing or two about hand-eye coordination.

Spring Sensory Play

Spring Sensory Play

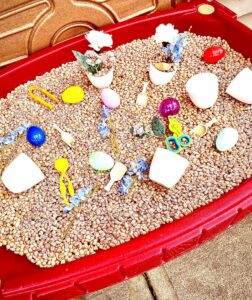
Let’s embrace promise of warmer weather with some spring sensory play for the kids! Sensory bins are a favorite for kids of almost all ages. From young toddlers to elementary age, sensory play is not only fun but educational. Making a sensory bin for your kids is simple and easy. Take a look at the one I created for my preschooler and elementary aged kids.

Start With a Base

First, you need to decide what you’re going to use to hold all your items. You want something that isn’t too deep but is wide. I have this table, but you could also use a baking tray or something you have around your house. For the base of your sensory play, you want something that is smallish, that can easily be scooped and poured. You also want something that can be easily cleaned up, because let’s face it, sensory play involves a lot of clean up (stay away from sand!). I really like to use rice or beans. They sweep up easily, and they aren’t dangerous if a child accidentally tries to eat them. For our spring bin, I chose a mixture of pinto and garbanzo beans. I like that these have varying shapes and textures. Little pom pom balls are also fun, especially if you’re looking for a quieter option.

Add Some Interest

It’s fairly easy to keep your sensory play base the same at all times. However, I highly encourage you to change up the items in the sensory bin every season, or every month if your kids play with it daily. I am going with a spring theme here. I’ve added some plastic Easter eggs, artificial flowers, and several small flower pots.

Add Some Tools

Adding tools to your sensory play is adding the fun. Kids love so much to scoop and pour. This provides a huge learning opportunity too. Young toddlers learn things like cause and effect, while older kids are visualizing and estimating volume. You want to add small containers or cups (remember those little flower pots?) as well as spoons and scoops of varying sizes. I have this set, and my kids absolutely love it. You can also add in things like tweezers or magnets.

Spring sensory play is so much fun for kids. Have you ever made a sensory play area for your kids? Let me know what you like to put in your sensory bin in the comments below. If it is still feeling like winter where you live, check out this post on activities to beat the winter blues. As always, please like and share this post if you found it helpful and encouraging.

Living in Zones

Living in Zones

I created zones for my kids and myself in our home. I felt like there was zero order to my home. Do you ever feel like that? Like there are people and things all over your house all the time? This is so common, especially when you have kids. It is especially so when you are homeschooling, because you are using your house each and every day. Toys migrate from the play room to the living room to the bedroom to even the bath tub. By the end of summer, I’d had enough of this mess, literally and figuratively.

What Do I Mean?

What do I mean by zones? I forget where I first heard of turning your space into zones, but I was reminded of the idea by Erin from Cotton Stem. The idea of creating zones means using your space intentionally to provide a change of scenery, spark creativity, or just a place to go that has a purpose. For example, that random corner in your kitchen that’s kind of dead space – let’s turn it into something useful!

Book Nook Zone

made a little book corner in her kids’ bedroom. I thought, “Wow, I can do that!”. And I did. I went around my house and grabbed my son’s Anywhere Chair, a cozy blanket my kids love, an extra end table we randomly had, the basket of books which was not getting read in our playroom, and voila! We had our own reading corner in the upstairs loft. We named it the Book Nook, and it is now where my big kids do their independent reading each day. They LOVE it, and they are actually reading the forgotten books that were formerly in the playroom.

Bonus School Space Zone

With the success of the Book Nook, I looked for other ways to implement more zones. We have a large loft area upstairs, and it wasn’t being utilized well. The book nook was in one corner of the room, but I saw the opportunity to make the loft even more purposeful. I moved a desk that was in my daughter’s room (it was only storing doll clothes) to the loft. I added a lamp and a globe to the desk. BOOM! Now we have a zone for school work other than our homeschool room. We use this when someone needs to move to a quiet space. Because the kids take online piano lessons, I moved our keyboard to the same wall as the desk to be included in the school zone.

TV and Video Game Zone

I positioned the TV and Nugget couch to the next area in the loft to create a “lounging zone”. The TV cabinet also stores our LEGOs, so these are out of the kid’s bedrooms. This little TV zone get a lot of use on the weekends when my kids watch more shows and enjoy playing the Wii. It’s a small area. It’s literally just the Nugget and the TV, but the special thing about creating zones is you don’t have to have a lot of space to make something special.

Gross Motor Zone

Finally, the last zone I created in our loft is the “gross motor” zone. This is the biggest zone. I have a toddler trampoline in a corner and a sensory swing to hang from the ceiling. The Nugget Couch can easily be pulled over to make an obstacle course, slide, or whatever the kids want to create. Lastly, I added the little toddler slide from the backyard. I wanted an area where kids could play rough and get their wiggles out. We live in the Midwest, and it will soon be too cold to play outside. Having this play space is essential, and it’s already being used.

Now It’s Your Turn

I know not everyone has a large unused loft in their home. However, the idea behind creating zones is using the little corners and nooks you do have. Turn them into a special place for your kids to go. Maybe it’s setting aside the end of your kitchen table and leaving out crafting supplies, or trays and tubs of playdough that the kids can access on their own. Maybe it’s taking that kids table that isn’t really getting used anymore and turning it into a board game table. Maybe you need a “mom zone” to keep your calendar, file mail, and meal plan. I created my “mom zone” in our kitchen. It is so nice to have all my things in one place. Assess what’s not working or take a space that isn’t being used efficiently, then let your imagination flourish. Take a look around and share what you come up with!

Below are a few links to some things that we have in our zones, but don’t feel like you have to buy a bunch of stuff. Shop your house first, then see where you need to fill in the blanks.

Indoor Sensory Swing:

Toddler Trampoline:

Cozy chair for your own Book Nook:

Toddler Slide: